Some of the Many Advantage of Cabinet Refacing

Cabinets provide a home with much-needed storage space. A good-looking kitchen also needs a good looking cabinet and not just any cabinet as this can be very costly to get refinished. But there are many advantages of cabinet refinishing.

This technique makes the furniture look brand new even though it is actually heavily used furniture made from wood that is a regular store bought item. It can easily be done by simply sanding, buffing, polishing, stains, varnish, etching, and then paint the cabinets. One of the main benefits of cabinet refinishing is that the wood is not susceptible to rotting, warping, or cracking. However, the wood used for cabinet refacing is always tanned, which gives it a very close match to the natural appearance of the wood.

Cabinet refacing has many advantages, it makes the furniture appears older, darker, and luxurious. The cabinets look like they have been taken care of over time and not just opened up and thrown away like a lot of people would think. The advantages of cabinet refacing are not only aesthetic but the dust particles and food particles can be easily cleaned off the surface, eliminating the need for professional cleaners and their poisonous chemicals. The cabinets look beautiful, in a way that reflects the personality of the person who owns them. Cabinets are usually the focal point of the kitchen and you would want them to stand out and look nice rather than blend in.

Refaced cabinets can also be given a new, modern look by simply adding new cabinet pulls. Many old-fashioned cabinet pulls, which were done without refacing, would have been very heavy, and would have been difficult to move around. Because of the refacing process, these old-style pulls are much easier to handle. You can now put different pull out trays, which offer storage for food, beverages, and things of that nature.

There are many woodworkers who specialize in refinishing the cabinets and giving them a new, modern look. The main advantage of refinishing is that when the wood is exposed to sunlight, its coloring will darken and stay a little longer which helps to make the wood stronger and resistant to various weather conditions.

The finish of the cabinet refacing and cabinet restoration is known as “faux varnish”. Faux varnish will have the same characteristics as the real varnish; it will stick to surfaces when the light hits it will eventually fade and become dull over time. But with the modern technology, cabinet refacing and cabinet restoration become one of the easiest processes to accomplish specially if done by a experts who do the cabinet restoration. Cabinet refacing and cabinet restoration make the room appear more attractive to anyone who visits the home, which increases the value of the property. It also creates a beautiful appearance in the home.

Shower To Tub Conversion – How To Convert Your Shower Into A Bathtub

The shower in the bathroom is not only used for bathing but can also be converted into a bathtub or even a sauna. One of the key elements in getting the shower remodeled to become a tub is determining the size of the shower and the end result of the changes will depend on the make of the shower and how it is used.

Shower, especially a heated one, can provide warmth to the bathroom as well as some splashing fun. Many bathrooms are equipped with hot tubs, which can be converted into a tub by simply widening the shower area. There are even additional steps needed to convert it into a bathtub. However, showering can be done in the regular bathtub once a conversion is made, and this makes the conversion quite simple to handle.

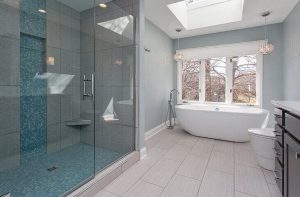
Shower remodeling can include many different elements. The most basic changes involve changing the tiles or other elements that line the walls. This is one of the simplest and the cheapest changes that can be done in the shower. When a person is deciding to add a new element in the shower, they should keep in mind that a lot of elements to add character to the bathroom. Click here to know more about bath conversion.

Changes in the bathroom will include re-decorating the bathtub and changing the walls as well. The accessories like the soap dishes and brushes can also be changed to fit the theme of the shower remodeling. Once the tiles are changed, the rest of the shower will be decided.

Some areas that are very simple to handle when converting shower remodeling into a tub are the curtains and the moldings. These elements are not important to the overall look of the shower. However, if the master bath is already converted to a bathtub, a changing of the moldings and curtains can give a more “plastic” look.

The plumbing can also be modified for the shower. A new, smaller toilet or a plumbing upgrade can make the shower more comfortable for the user. There are times when using a larger bathroom means that there is no more room to have a larger shower head. In such cases, a smaller shower head may be the right choice for the bathroom.

If the shower is not already a bathtub, a bathtub can be installed in the same space as the shower. This can be done with any modern shower and will give the users the opportunity to enjoy both bathing and a bathtub at the same time. However, if the bathroom is not already equipped with a bathtub, it may be necessary to invest in one, which will take up a lot of space in the bathroom. But then again, these types of showers are usually very stylish, and they also bring a luxurious look to the bathroom, which is another reason why people prefer them.

There are many things that can be done to modify the shower for a bathtub in the bathroom. The main thing is that one should not compromise on the quality of the design or on the bathroom fixtures. Since bathroom remodeling can be expensive, it is better to find a professional who will ensure that the shower renovation is perfect, and it will not be an eyesore.

Home Renovation: Tips For Installing New Tile Flooring

Some people in your home are allergic to certain materials when installing new tile flooring. If you notice this happening you may want to consider a different option, or get your flooring contractor to take a look at the area to see if you could be allergic to the material. If you do have a problem, they may be able to customize a solution to help you with this problem. Just know that the majority of all types of flooring will not cause any problems, and are generally a very safe product for installing.

The best thing to do before installing new tile flooring is to first go over the existing floor to make sure everything is smooth and clean. Any rugs, furniture, floors, or countertops should be wiped down to remove any oils and dust. Then it is a good idea to sand the area down by hand and then use a grinder to smooth out any rough spots or areas where there may be a texture to take away. This helps make it a lot easier to install new flooring.

Once you have the area completely clean and free of any unwanted objects, you can now begin to work on installing new flooring. For ease, most companies do the flooring themselves and install them in a similar way that you would install tile. Most installers even use a non-slip floor sealer on their floors to make sure the installation will be safe.

First, When installing new tile flooring keep in mind the following tips. First, there is no right or wrong way to install new flooring. Install it how it looks best to you. It is not necessary to always have tiles running vertically down the entire length of your home, but some people prefer it.

Second, remember to install new flooring in areas where it is going to be worn. The darker colors are usually more comfortable but don’t be afraid to try to light colors. Also, if the new flooring does not fit perfectly, you may want to buy an extra piece or two and cut them down to size to cover the areas that need to be covered.

Third, new tile flooring is usually installed without nails. As long as the flooring is smooth and free of any bumps or crevices, you can use drywall anchors instead. These are already made into your flooring installation and don’t require any tools, glue, or fasteners. Be sure to test them out to make sure they won’t fall off or hurt the user when they are trying to walk on them.

Fourth, make sure that you install new tile flooring in places where it can be easily seen from the living room or the kitchen. By doing this, you will be able to easily spot and grab items you want to be close to the table or countertop, such as condiments, coffee cups, cutlery, etc. Also, make sure that you have enough lighting throughout the room, and for that matter, throughout the house to make your new flooring visible. Make sure that all light fixtures are correctly placed and that they are not too far away.

Fifth, if you are working with new tile flooring you may want to consider using wax or sealant to help protect the new flooring. The paint or stain is not able to penetrate the new tile. It is like a temporary coating that will give you the added protection that you need until the floor is fully installed and ready to be walked on.